Παρασκευή 22 Μαΐου 2020

John The Ripper


"A powerful, flexible, and fast multi-platform password hash cracker John the Ripper is a fast password cracker, currently available for many flavors of Unix (11 are officially supported, not counting different architectures), DOS, Win32, BeOS, and OpenVMS. Its primary purpose is to detect weak Unix passwords. It supports several crypt(3) password hash types which are most commonly found on various Unix flavors, as well as Kerberos AFS and Windows NT/2000/XP LM hashes. Several other hash types are added with contributed patches. You will want to start with some wordlists, which you can find here or here. " read more...

Website: http://www.openwall.com/john

More info

  1. Capture The Flag Hacking
  2. Hacking Wikipedia
  3. Hacking Xbox One
  4. Hacking School
  5. El Hacker
  6. Hacking Ético Curso
  7. Que Es Hacking Etico
  8. Hacking Tutorials
  9. Hacking Etico
  10. Hacking Udemy
  11. Herramientas Hacking Etico

Πέμπτη 21 Μαΐου 2020

HACK SNAPCHAT ACCOUNT BY MAC SPOOFING

In the last article, I have discussed a method on how to hack SnapChat account using SpyStealth Premium App. In this article, I am gonna show you an advanced method that how to hack SnapChat account by mac spoofing. It works same as WhatsApp hacking by mac spoofing. It's a bit more complicated than the last method discussed and requires proper attention. It involves the spoofing of the mac address of the target device. Let's move on how to perform the attack.

HOW TO HACK SNAPCHAT ACCOUNT BY MAC SPOOFING?

Note: This method will work if SnapChat is created on a phone number.
Here I will show you complete tutorial step by step of hacking the SnapChat account. Just understand each step carefully.
  1. Find out the victim's phone and note down it's Mac address. To get the mac address in Android devices, go to Settings > About Phone > Status > Wifi Mac address. And here you'll see the mac address. Just write it somewhere. We'll use it in the upcoming steps.
  2. As you get the target's mac address, you have to change your phone's mac address with the target's mac address. Perform the steps mentioned in this article on how to spoof mac address in android phones.
  3. Now install SnapChat on your phone and use victim's number while you're creating an account. It'll send a verification code to victim's phone. Just grab the code and enter it here.
  4. Once you do that, it'll set all and you'll get all chats and messages which victims sends or receives.
This method is really a good one but very difficult for the non-technical users. Only use this method if you're technical skills and have time to perform every step carefully. Otherwise, you can hack SnapChat account using Spying app.

Related articles


  1. Programas De Hacker
  2. Fake Hacking
  3. Hacking Informatico
  4. Hacking Apps
  5. Hacking Games
  6. Cómo Se Escribe Hacker
  7. Curso Hacker
  8. Growth Hacking Instagram
  9. Hacking Day
  10. Hacking Con Buscadores Pdf
  11. Capture The Flag Hacking
  12. Hacking Web Sql Injection Pdf
  13. Hacking Games Online

Sslmerge - Tool To Help You Build A Valid SSL Certificate Chain From The Root Certificate To The End-User Certificate


Is an open source tool to help you build a valid SSL certificate chain from the root certificate to the end-user certificate. Also can help you fix the incomplete certificate chain and download all missing CA certificates.

How To Use
It's simple:
# Clone this repository
git clone https://github.com/trimstray/sslmerge

# Go into the repository
cd sslmerge

# Install
./setup.sh install

# Run the app
sslmerge -i /data/certs -o /data/certs/chain.crt
  • symlink to bin/sslmerge is placed in /usr/local/bin
  • man page is placed in /usr/local/man/man8

Parameters
Provides the following options:
  Usage:
sslmerge <option|long-option>

Examples:
sslmerge --in Root.crt --in Intermediate1.crt --in Server.crt --out bundle_chain_certs.crt
sslmerge --in /tmp/certs --out bundle_chain_certs.crt --with-root
sslmerge -i Server.crt -o bundle_chain_certs.crt

Options:
--help show this message
--debug displays information on the screen (debug mode)
-i, --in add certificates to merge (certificate file, multiple files or directory with ssl certificates)
-o, --out saves the result (chain) to file
--with-root add root certificate to the certificate chain

How it works
Let's start with ssllabs certificate chain. They are delivered together with the sslmerge and can be found in the example/ssllabs.com directory which additionally contains the all directory (containing all the certificates needed to assemble the chain) and the server_certificate directory (containing only the server certificate).
The correct chain for the ssllabs.com domain (the result of the openssl command):
Certificate chain
0 s:/C=US/ST=California/L=Redwood City/O=Qualys, Inc./CN=ssllabs.com
i:/C=US/O=Entrust, Inc./OU=See www.entrust.net/legal-terms/OU=(c) 2012 Entrust, Inc. - for authorized use only/CN=Entrust Certification Authority - L1K
1 s:/C=US/O=Entrust, Inc./OU=See www.entrust.net/legal-terms/OU=(c) 2012 Entrust, Inc. - for authorized use only/CN=Entrust Certification Authority - L1K
i:/C=US/O=Entrust, Inc./OU=See www.entrust.net/legal-terms/OU=(c) 2009 Entrust, Inc. - for authorized use only/CN=Entrust Root Certification Authority - G2
2 s:/C=US/O=Entrust, Inc./OU=See www.entrust.net/legal-terms/OU=(c) 2009 Entrust, Inc. - for authorized use only/CN=Entrust Root Certification Authority - G2
i:/C=US/O=Entrust, Inc./OU=www.entrust.net/CPS is incorporated by reference/OU=(c) 2006 Entrust, Inc./CN=Entrust Root Certification Authority
The above code presents a full chain consisting of:
  • Identity Certificate (Server Certificate)
    issued for ssllabs.com by Entrust Certification Authority - L1K
  • Intermediate Certificate
    issued for Entrust Certification Authority - L1K by Entrust Root Certification Authority - G2
  • Intermediate Certificate
    issued for Entrust Root Certification Authority - G2 by Entrust Root Certification Authority
  • Root Certificate (Self-Signed Certificate)
    issued for Entrust Root Certification Authority by Entrust Root Certification Authority

Scenario 1
In this scenario, we will chain all delivered certificates. Example of running the tool:

Scenario 2
In this scenario, we only use the server certificate and use it to retrieve the remaining required certificates. Then, as above, we will combine all the provided certificates. Example of running the tool:

Certificate chain
In order to create a valid chain, you must provide the tool with all the necessary certificates. It will be:
  • Server Certificate
  • Intermediate CAs and Root CAs
This is very important because without it you will not be able to determine the beginning and end of the chain.
However, if you look inside the generated chain after generating with sslmerge, you will not find the root certificate there. Why?
Because self-signed root certificates need not/should not be included in web server configuration. They serve no purpose (clients will always ignore them) and they incur a slight performance (latency) penalty because they increase the size of the SSL handshake.
If you want to add a root certificate to the certificate chain, call the utility with the --with-root parameter.

Certification Paths
Sslmerge allows use of two certification paths:

Output comments
When generating the chain of certificates, sslmerge displays comments with information about certificates, including any errors.
Here is a list of all possibilities:

not found identity (end-user, server) certificate
The message is displayed in the absence of a server certificate that is the beginning of the chain. This is a unique case because in this situation the sslmerge ends its operation displaying only this information. The server certificate is the only certificate required to correctly create a chain. Without this certificate, the correct chain will not be created.

found correct identity (end-user, server) certificate
The reverse situation here - message displayed when a valid server certificate is found.

not found first intermediate certificate
This message appears when the first of the two intermediate certificates is not found. This information does not explicitly specify the absence of a second intermediate certificate and on the other hand it allows to determine whether the intermediate certificate to which the server certificate was signed exists. Additionally, it can be displayed if the second intermediate certificate has been delivered.

not found second intermediate certificate
Similar to the above, however, it concerns the second intermediate certificate. However, it is possible to create the chain correctly using the second certification path, e.g. using the first intermediate certificate and replacing the second with the main certificate.

one or more intermediate certificate not found
This message means that one or all of the required intermediate certificates are missing and displayed in the absence of the root certificate.

found 'n' correct intermediate certificate(s)
This message indicates the number of valid intermediate certificates.

not found correct root certificate
The lack of the root certificate is treated as a warning. Of course, when configuring certificates on the server side, it is not recommended to attach a root certificate, but if you create it with the sslmerge, it treats the chain as incomplete displaying information about the incorrect creation of the chain.

an empty CN field was found in one of the certificates
This message does not inform about the error and about the lack of the CN field what can happen with some certificates (look at example/google.com). Common Name field identifies the host name associated with the certificate. There is no requirement in RFC3280 for an Issuer DN to have a CN. Most CAs do include a CN in the Issuer DN, but some don't, such as this Equifax CA.

Requirements
Sslmerge uses external utilities to be installed before running:

Other

Contributing
See this.

Project architecture
See this.


Related links


  1. El Hacker Pelicula
  2. Aprender Hacking Etico
  3. Hacking Tutorials
  4. Diferencia Entre Hacker Y Cracker
  5. Body Hacking
  6. Como Ser Hacker
  7. Tutoriales Hacking
  8. Hacking Attacks
  9. Que Es El Hacking
  10. Hacking Marketing
  11. Hacking Con Buscadores
  12. Hacking Wifi Android
  13. Hacking Live
  14. Hacking Virus
  15. Mindset Hacking Nacho

Τρίτη 19 Μαΐου 2020

Galileo - Web Application Audit Framework

Read more


  1. Libros Hacking Pdf
  2. Hacking Prank
  3. Raspberry Hacking
  4. Rom Hacking Pokemon
  5. Hacking With Python
  6. Udemy Hacking
  7. Escuela De Hacking
  8. Curso Completo De Hacking Ético
  9. House Hacking
  10. Hacking Mifare
  11. Curso Completo De Hacking Ético
  12. Hacking Con Buscadores Pdf
  13. Google Hacking
  14. Growth Hacking Cursos
  15. Hacking Music

Linux Command Line Hackery Series - Part 6


Welcome back to Linux Command Line Hackery series, I hope you've enjoyed this series so far and would have learned something (at least a bit). Today we're going to get into user management, that is we are going to learn commands that will help us add and remove users and groups. So bring it on...

Before we get into adding new users to our system lets first talk about a command that will be useful if you are a non-root user.

Command: sudo
Syntax: sudo [options] command
Description: sudo allows a permitted user to execute a command as a superuser or another user.

Since the commands to follow need root privileges, if you are not root then don't forget to prefix these commands with sudo command. And yes you'll need to enter the root password in order to execute any command with sudo as root.

Command: useradd
Syntax: useradd [options] username
Description: this command is used for creating new user but is kinda old school.
Lets try to add a new user to our box.
[Note: I'm performing these commands as root user, you'll need root privileges to add a new user to your box. If you aren't root then you can try these commands by prefixing the sudo command at the very beginning of these command like this sudo useradd joe. You'll be prompted for your root password, enter it and you're good to go]

useradd joe

To verify that this command has really added a user to our box we can look at three files that store a users data on a Linux box, which are:

/etc/passwd -> this file stores information about a user separated by colons in this manner, first is login name, then in past there used to be an encrypted password hash at the second place however since the password hashes were moved to shadow file now it has a cross (x) there, then there is user id, after it is the user's group id, following it is a comment field, then the next field contains users home directory, and at last is the login shell of the user.

/etc/group  -> this file stores information about groups, that is id of the group and to which group an user belongs.

/etc/shadow -> this file stores the encrypted password of users.

Using our command line techniques we learned so far lets check out these files and verify if our user has been created:

cat /etc/passwd /etc/group /etc/shadow | grep joe


In the above screenshot you can notice an ! in the /etc/shadow, this means the password of this user has not been set yet. That means we have to set the password of user joe manually, lets do just that.

Command: passwd
Syntax: passwd [options] [username]
Description: this command is used to change the password of user accounts.
Note that this command needs root privileges. So if you are not root then prefix this command with sudo.

passwd joe


After typing this command, you'll be prompted password and then for verifying your password. The password won't show up on the terminal.
Now joe's account is up and running with a password.

The useradd command is a old school command, lets create a new user with a different command which is kinda interactive.

Command: adduser
Syntax: adduser [options] user
Description: adduser command adds a user to the system. It is more friendly front-end to the useradd command.

So lets create a new user with adduser.

adduser jane


as seen in the image it prompts for password, full name and many other things and thus is easy to use.

OK now we know how to create a user its time to create a group which is very easy.

Command: addgroup
Syntax: addgroup [options] groupname
Description: This command is used to create a new group or add an existing user to an existing group.

We create a new group like this

addgroup grownups


So now we have a group called grownups, you can verify it by looking at /etc/group file.
Since joe is not a grownup user yet but jane is we'll add jane to grownups group like this:

addgroup jane grownups


Now jane is the member of grownups.

Its time to learn how to remove a user from our system and how to remove a group from the system, lets get straight to that.

Command: deluser
Syntax: deluser [options] username
Description: remove a user from system.

Lets remove joe from our system

deluser joe

Yes its as easy as that. But remember by default deluser will remove the user without removing the home directory or any other files owned by the user. Removing the home directory can be achieved by using the --remove-home option.

deluser jane --remove-home

Also the --remove-all-files option removes all the files from the system owned by the user (better watch-out). And to create a backup of all the files before deleting use the --backup option.

We don't need grownups group so lets remove it.

Command: delgroup
Syntax: delgroup [options] groupname
Description: remove a group from the system.

To remove grownups group just type:

delgroup grownups


That's it for today hope you got something in your head.

Related word


  1. White Hacking
  2. Hacking Microsoft
  3. Hacking Course
  4. Brain Hacking
  5. Hacking Games Online

HTTP Status Codes Command This Malware How To Control Hacked Systems

A new version of COMpfun remote access trojan (RAT) has been discovered in the wild that uses HTTP status codes to control compromised systems targeted in a recent campaign against diplomatic entities in Europe. The cyberespionage malware—traced to Turla APT with "medium-to-low level of confidence" based on the history of compromised victims—spread via an initial dropper that masks itself as

via The Hacker NewsRead more
  1. Hacking Etico 101 Pdf
  2. Aprender Hacking Desde Cero
  3. Que Es Hacker En Informatica
  4. Tutorial Hacking
  5. Hacking Usb
  6. Programas Para Hackear
  7. Hacking Web Sql Injection Pdf
  8. Que Es Un Hacker
  9. Como Convertirse En Hacker
  10. Hacking Movies
  11. Hacking Mifare

Δευτέρα 18 Μαΐου 2020

One Reason Why InfoSec Sucked In The Past 20 Years - The "Security Tips" Myth

From time to time, I get disappointed how much effort and money is put into securing computers, networks, mobile phones, ... and yet in 2016 here we are, where not much has changed on the defensive side. There are many things I personally blame for this situation, and one of them is the security tips.

The goal of these security tips is that if the average user follows these easy to remember rules, their computer will be safe. Unfortunately, by the time people integrate these rules into their daily life, these rules either become outdated, or these rules were so oversimplified that it was never true in the first place. Some of these security tips might sound ridiculous to people in InfoSec nowadays, but this is exactly what people still remember because we told them so for years.

PDF is safe to open

This is an oldie. I think this started at the time of macro viruses. Still, people think opening a PDF from an untrusted source is safer than opening a Word file. For details why this is not true, check: https://www.cvedetails.com/vulnerability-list/vendor_id-53/product_id-497/Adobe-Acrobat-Reader.html
On an unrelated note, people still believe PDF is integrity protected because the content cannot be changed (compared to a Word document).
Image stolen from Kaspersky

Java is secure

One of the best ones. Oracle started marketing Java as a safe language, where buffer overflows, format strings and pointer-based vulnerabilities are gone. Unfortunately, they forgot to tell the world that instead of "unsafe programs developed by others" they installed their unsafe program on 3 billion devices. 

Stay away from rogue websites and you will be safe

This is a very common belief I hear from average people. "I only visit some trusted news sites and social media, I never visit those shady sites." I have some bad news. At the time of malvertising and infected websites, you don't have to visit those shady sites anymore to get infected.

Don't use open WiFi

I have a very long explanation of why this makes no sense, see here. Actually, the whole recommendation makes no sense as people will connect to public WiFis, no matter what we (InfoSec) recommend.

The password policy nightmare

Actually, this topic has been covered by myself in two blog posts, see here and here. Long story short: use a password manager and 2-factor authentication wherever possible. Let the password manager choose the password for you. And last but not least, corporate password policy sux.

Sites with a padlock are safe

We tell people for years that the communication with HTTPS sites are safe, and you can be sure it is HTTPS by finding a randomly changing padlock icon somewhere next to the URL. What people hear is that sites with padlocks are safe. Whatever that means. The same goes for WiFi - a network with a padlock is safe.

Use Linux, it is free from malware

For years people told to Windows users that only if they would use Linux they won't have so much malware. Thanks to Android, now everyone in the world can enjoy malware on his/her Linux machine.

OSX is free from malware

It is true that there is significantly less malware on OSX than on Windows, but this is an "economical" question rather than a "security" one. The more people use OSX, the better target it will become. Some people even believe they are safe from phishing because they are using a Mac!

Updated AV + firewall makes me 100% safe

There is no such thing as 100% safe, and unfortunately, nowadays most malware is written for PROFIT, which means it can bypass these basic protections for days (or weeks, months, years). The more proactive protection is built into the product, the better!

How to backup data

Although this is one of the most important security tips which is not followed by people, my problem here is not the backup data advise, but how we as a community failed to provide easy to use ways to do that. Now that crypto-ransomware is a real threat to every Windows (and some OSX) users, even those people who have backups on their NAS can find their backups lost. The only hope is that at least OSX has Time Machine which is not targeted yet, and the only backup solution which really works.
The worst part is that we even created NAS devices which can be infected via worms ...

Disconnect your computer from the Internet when not used

There is no need to comment on this. Whoever recommends things like that, clearly has a problem.

Use (free) VPN to protect your anonimity

First of all. There is no such thing as free service. If it is free, you are the service. On another hand, a non-free VPN can introduce new vulnerablities, and they won't protect your anonymity. It replaces one ISP with another (your VPN provider). Even TOR cannot guarantee anonymity by itself, and VPNs are much worse.

The corporate "security tips" myth

"Luckily" these toxic security tips have infected the enterprise environment as well, not just the home users.

Use robots.txt to hide secret information on public websites

It is 2016 and somehow web developers still believe in this nonsense. And this is why this is usually the first to check on a website for penetration testers or attackers.

My password policy is safer than ever

As previously discussed, passwords are bad. Very bad. And they will stick with us for decades ...

Use WAF, IDS, IPS, Nextgen APT detection hibber-gibber and you will be safe

Companies should invest more in people and less into magic blinking devices.

Instead of shipping computers with bloatware, ship computers with exploit protection software
Teach people how to use a password safe
Teach people how to use 2FA
Teach people how to use common-sense

Conclusion

Computer security is complex, hard and the risks change every year. Is this our fault? Probably. But these kinds of security tips won't help us save the world. 

Related articles


Spykey - FUD Win32 Keylogger And Reverse Shell

More articles


  1. Que Hay Que Estudiar Para Ser Hacker
  2. Paginas Para Hackear
  3. Google Hacking Database
  4. Curso De Hacking Etico
  5. Codigo Hacker
  6. Seguridad Y Hacking
  7. Wifi Hacking

How To Change Facebook’s Default Theme To Any Color You Want

Change Facebook Theme Using Chrome Extension

How To Change Facebook's Default Theme To Any Color You Want

We are going to share an interesting trick on changing your Facebook default theme. You just need a Google Chrome extension to perform this trick. If you are among me who feels very fatigued with the look of Facebook's by default theme then this is a must-see post because you will find out the easiest trick to make your facebook more attractive than before.

Facebook is a social networking site which empowers people to connect with friends and people around. That's how Facebook is habitually introduced. However, Facebook is beyond the need of being introduced as almost everyone is on it.
   A couple of Days ago I was simply Surfing Google Chrome website and I somehow stumbled upon a Chrome Extension. Yes, a Chrome extension that will give your Facebook a Whole new look. I was apprehensive to try it, So I just installed it and checked my facebook. I was astonished to see my facebook homepage have all new look. I found it refreshing and decided to write steps on How to Change Facebook Themes using Chrome Extension.

How To Change Facebook's Default Theme To Any Color You Want

If You are among me who feels very fatigued with the look of Facebook's by default theme then this is a must-see post, Because you will find out the easiest trick to make your facebook more attractive than before. Simply follow the steps to know about it.

How to Change Facebook Theme Using Chrome Extension

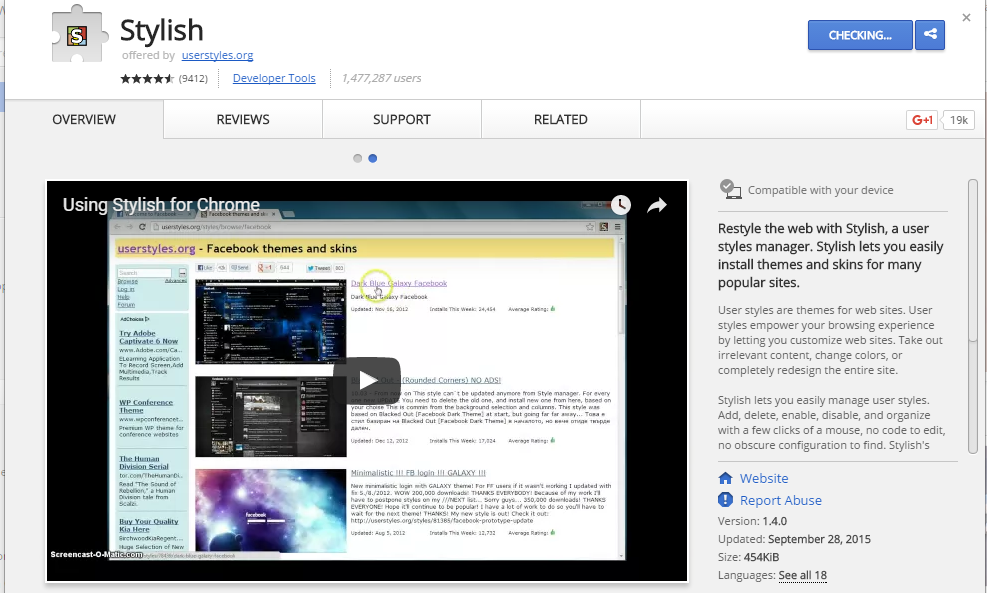
Step 1. Install Stylish for Chrome from the Chrome Web Store. It will take hardly a minute to get installed in your Chrome browser.
Change Facebook Theme Using Chrome Extension
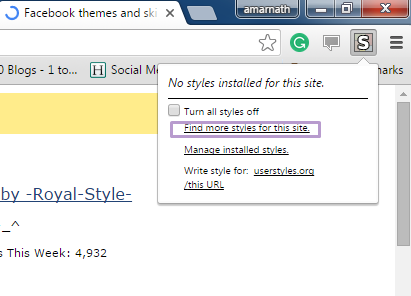
Step 2. Navigate to Facebook.com and click on the S button. Click on Find Styles for this Site to open a new tab with free themes to use for Facebook. Most of the themes are free and attractive too you can easily browse over the full website to discover your favorite theme.
Change Facebook Theme Using Chrome Extension
Step 3. Now You will be redirected towards https://userstyles.org Guess what! This site contains huge numbers of Facebook themes, One thing is for sure that you will be confused in-between what to select and which one to skip. Select any them and click on it. Now you will be given a full preview of your selected theme.
Change Facebook Theme Using Chrome Extension
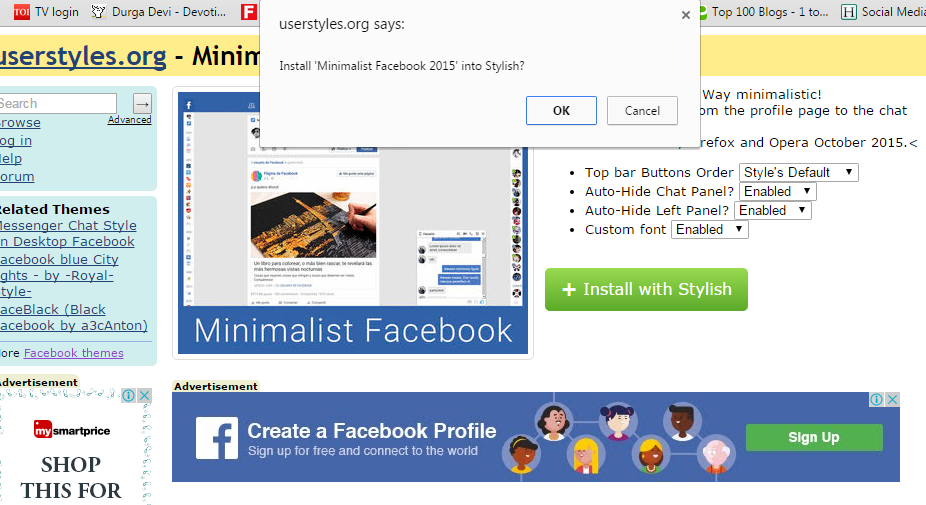
Step 4. If everything is fine in the previewed theme, click on Install with Stylish button at the top right corner of the page. It will take few seconds or minutes depends on your theme size to be installed in Stylish Extension, once installed you will be notified with a success message.
Change Facebook Theme Using Chrome Extension
Step 5. Now whenever you open Facebook, it will show the theme that you have installed with Stylish instead of the boring old blue theme.
Change Facebook Theme Using Chrome Extension

Related word